Ferr Vertex Painter Quickstart Guide

Getting started with Ferr Vertex Painter is particularly simple, it's designed to be as intuitive and easy as possible!
- Open the Ferr Vertex Painter window.
- Select one or more paintable objects.
- Paint using the left mouse!
1. Vertex painter window.
To do vertex painting, you'll need to open the Vertex Painter window, which you can find under [Window->Ferr Vertex Painter] or [Tools->Ferr->Vertex Painter], and select a paintable object!
The window is designed to be small and unobtrusive, but frequently works best when docked to one side of the scene window! Place it wherever you like :)
2. Selectable objects.
| - Have a MeshFilter on them! | - Basic vertex color painter |
| - Use a shader with the text "Blend" in its name/path. | - Texture blend painter |
| - Use a shader with 2 main textures. | - Texture blend painter |
| - Use a shader with the text "Flow" in its name/path. | - Flow painter |
You can often override the painting tool by selecting it from the tool dropdown in the painter window, in case you have a compatible shader that doesn't follow the automatic selection patterns!
If you're a coder, and you'd like to extend the Vertex Painter, simply implement the IBlendPaintType interface, and Ferr will automatically detect your painting tool! IBlendPaintType is in the Ferr Common section of the tool, which is available under the MIT license. (https://github.com/maluoi/FerrCommon) So feel free to publish painting extensions using the IBlendPaintType interface. Implementing the IBlendPaintable interface will also allow you to listen to painting events, so if you have objects that need to do something special when painted, feel free to hook into that as well!
3. Painting.

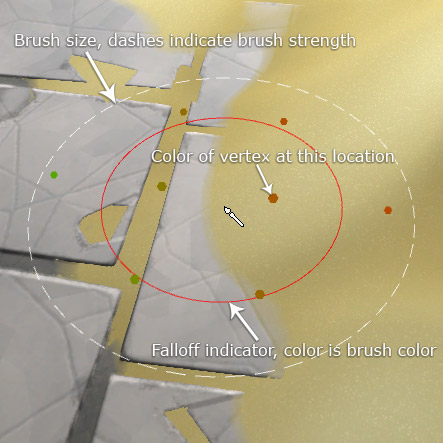
Ferr Vertex Painter is designed to be completely usable even without the window visible. As much control and information as possible has been packed into the brush visuals and keyboard shortcuts!
As you can see in the image, every part of the brush attempts to tell you something without getting in your way! You can customize the appearance and data shown on the brush in [Edit->Preferences->Ferr VertPaint]
| p | Toggles paint mode on and off, works outside paint mode. |
| c | Activates the vertex color picker. |
| 1, 2, 3, 4 | Tool specific, selects color/texture channels: r, g, b, or a |
| [ & ] | Decreases or increases the brush size. |
| Ctrl + Scroll | Decreases or increases the brush size. |
| ; & ' | Decreases or increases brush strength. |
| Shift + Scroll | Decreases or increases brush strength. |
| < & > | Decreases or increases falloff. |
| Ctrl + Shift + Scroll | Decreases or increases falloff. |
4. Shaders

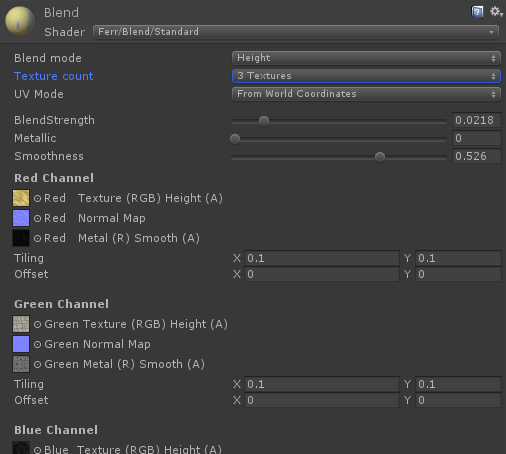
Ferr Vertex Painter includes a selection of shaders to work with the paint tool! All Blend textures can blend up to 4 different textures together, and include variations for a variety of common lighting models. Ferr Blend shaders also include 3 blending modes, Hard, Soft and Height based, as well as choosing UV coordinates from the mesh, or from world coordinates on the XZ-plane.
If using Height blend mode, the shader will look for height values in the alpha channel of the primary texture.
When considering performance, remember that using fewer texture channels leads to a faster shader. If you don't need all four texture channels, try bumping it down.
You can find the Vertex Painter shaders in [Ferr/Blend/] and [Ferr/Flow]
5. Mesh Modifications

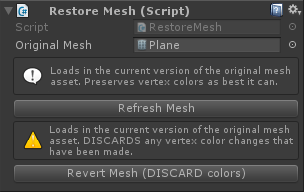
While painting a mesh, you may decide that you need to change that mesh in your modeling software! Since Ferr Vertex Paint modifies your mesh, it becomes disconnected from the original asset. Fortunately, the painter adds a RestoreMesh component that will preserve the link to the original mesh, allowing you to update to the newest version of your asset.
Normally, this would also discard any painting you had done previously, but if you use the 'Refresh Mesh' button, Ferr will do its best to preserve your painting! Significant changes may not preserve colors well, but it will likely preserve a portion of your paint-work.
Or, if you simply want to discard your painting and just use the raw original mesh, use the 'Revert Mesh (DISCARD colors) button instead!'

